So you’re ready to start your own YouTube Automation Channel?
In this article, we’ll give you the 10 steps to start, grow & automate your YouTube Channel and create a real passive income business. Let’s get started!
Check out our automated YouTube Channel for inspiration as well.
What Are The 10 Steps To Start A Profitable YouTube Automation Channel?
The first thing you need to understand about starting a YouTube Automation Channel is that it is a real business that offers real passive income.
Let’s run through the 10 steps to starting your channel so you can become a true business owner.
Step 1: Mindset
The first step in starting a YouTube Automation business is to understand that in order to run a business, you need to think and act like a business owner.
Building an automation channel requires you to leverage a team that can push out high quality content at scale.
You need to shift your mindset to understand that your job is not to create content yourself, but rather to create systems capable of creating content on their own.
So make sure you understand this difference and also know that building a business requires investment as well. You will need to invest your time as well as some of your money to get this business up and running, but it will all be worth it in the end!
Also remember that any investment you make in yourself and in your business will always be worth it.
Managing Expectations
The other thing we have to address related to your mindset is that you need to manage your expectations.
YouTube views are hard to come by right out of the gate, and your first few videos are likely not going to be any good. Understand that it is a slow start, but that one video can change the entire trajectory of your channel and even your life!
Viral videos will come, but you must be patient and play the long game from the beginning. We recommend you commit yourself to your youtube automation business for at least 6 months, so make sure to plan accordingly and never give up!
Step 2: Define Your Channel
Next, you’ll need to choose a niche for your channel.
This should be something you’re deeply passionate about and also a topic that already has a proven audience on YouTube.
Come up with a list of your passions and consider whether or not any of them make for a good YouTube Channel. Is there an audience for this content? Are there videos going viral at this exact moment in this niche?
If so, you’re off to a good start!
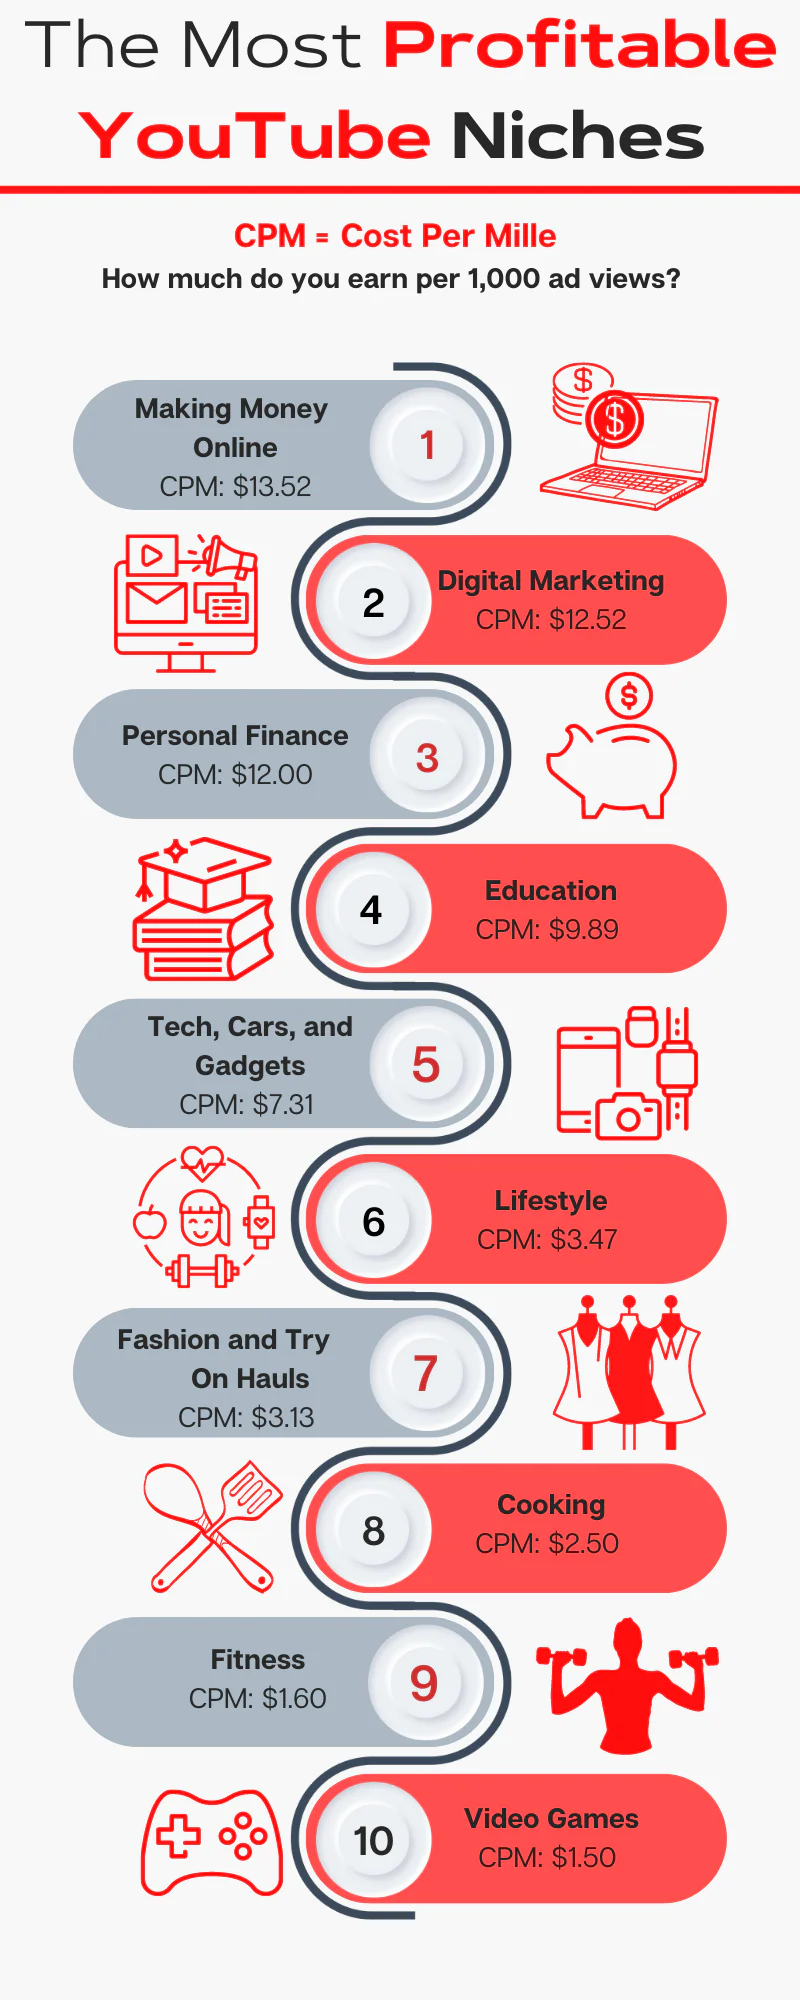
If you need more inspiration, here are the most profitable YouTube niches based on CPM (what you earn for every 1,000 ad views):
- Make Money Online (CPM: $13.52)
- Digital Marketing (CPM: $12.52)
- Personal Finance (CPM: $12.00)
- Education (CPM: $9.89)
- Tech, Cars & Gadgets (CPM: $7.31)
- Lifestyle (CPM: $3.47)
- Fashion (CPM: $3.13)
- Cooking (CPM: $2.50)
- Fitness (CPM: $1.60)
- Video Games (CPM: $1.50)
Keep in mind as you’re figuring out your niche that you will need to set yourself apart from other content in the niche. In fact, your content must be better than the other content in the niche if you want to be successful.
Step 3: Stock Footage & YouTube Downloader
The entire idea behind a YouTube Automation Channel is that it can operate on its own. You build the processes and fund the operations, and the channel pays you as the business owner.
Therefore, your videos will be made up of repurposed content rather than original content that you yourself create.
Since you will be reusing other creator’s content, you need to make sure you understand YouTube’s Community Guidelines as well as how Fair Use Law applies to your channel.
The best way to avoid copyright claims on your videos is to obtain rights to the footage you are using through various stock footage providers.
You can get by with some free stock footage but if you want to create the best content, get the most views, and earn the most money we recommend investing in premium stock footage from Artlist.
Free Stock Footage
Here are some of the best free stock footage providers:
Premium Stock Footage
Here are our favorite premium stock footage providers:
YouTube Downloader
For other footage that may not be available through stock footage providers, you will need to find a reliable 4K YouTube Video Downloader so that you can take short video and audio clips and incorporate them into your videos.
We currently use this YouTube Video Downloader and find that it provides clean footage without watermarks.
Make sure to download the MP4 version to then import into your video editing software.
Where To Find Additional Clips For Your Videos
When coming up with video ideas and sourcing clips for our YouTube automation videos, we like to browse YouTube Shorts, Instagram Reels & TikTok to see what content is performing well on those platforms.
Then, we take those clips and leverage them to add value to our content and draw in more viewers.
Step 4: Set Up Your Channel
Next, you need to set your channel up for success!
YouTube Banner
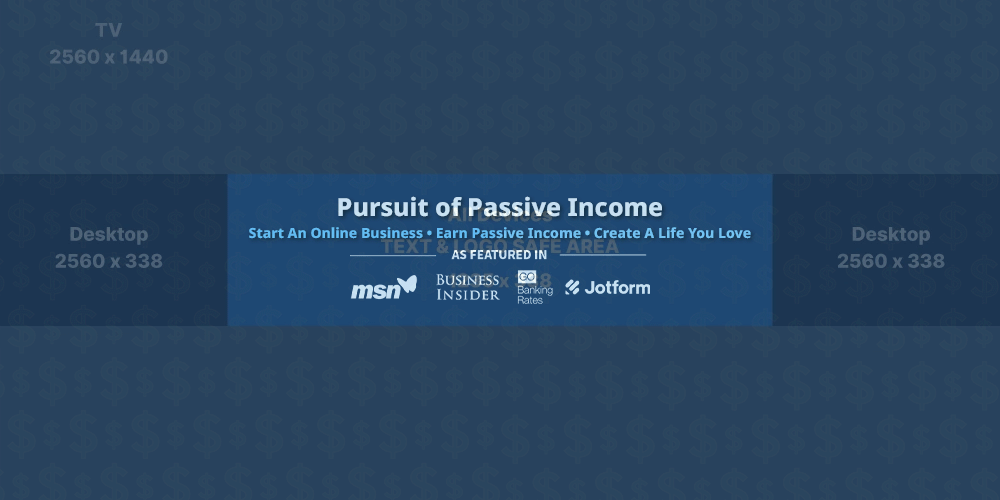
Let’s start with the banner for your channel. The best thing to do here is take inspiration from the other successful channels in your niche.
We created our banner using Photoshop, but you can use Canva for free as well!
Our banner is included above which shows the template overlay as well. The full TV dimensions are 2560 x 1440, Desktop dimensions are 2560 x 338, and the safe area for all devices is 1235 x 338.
Branding
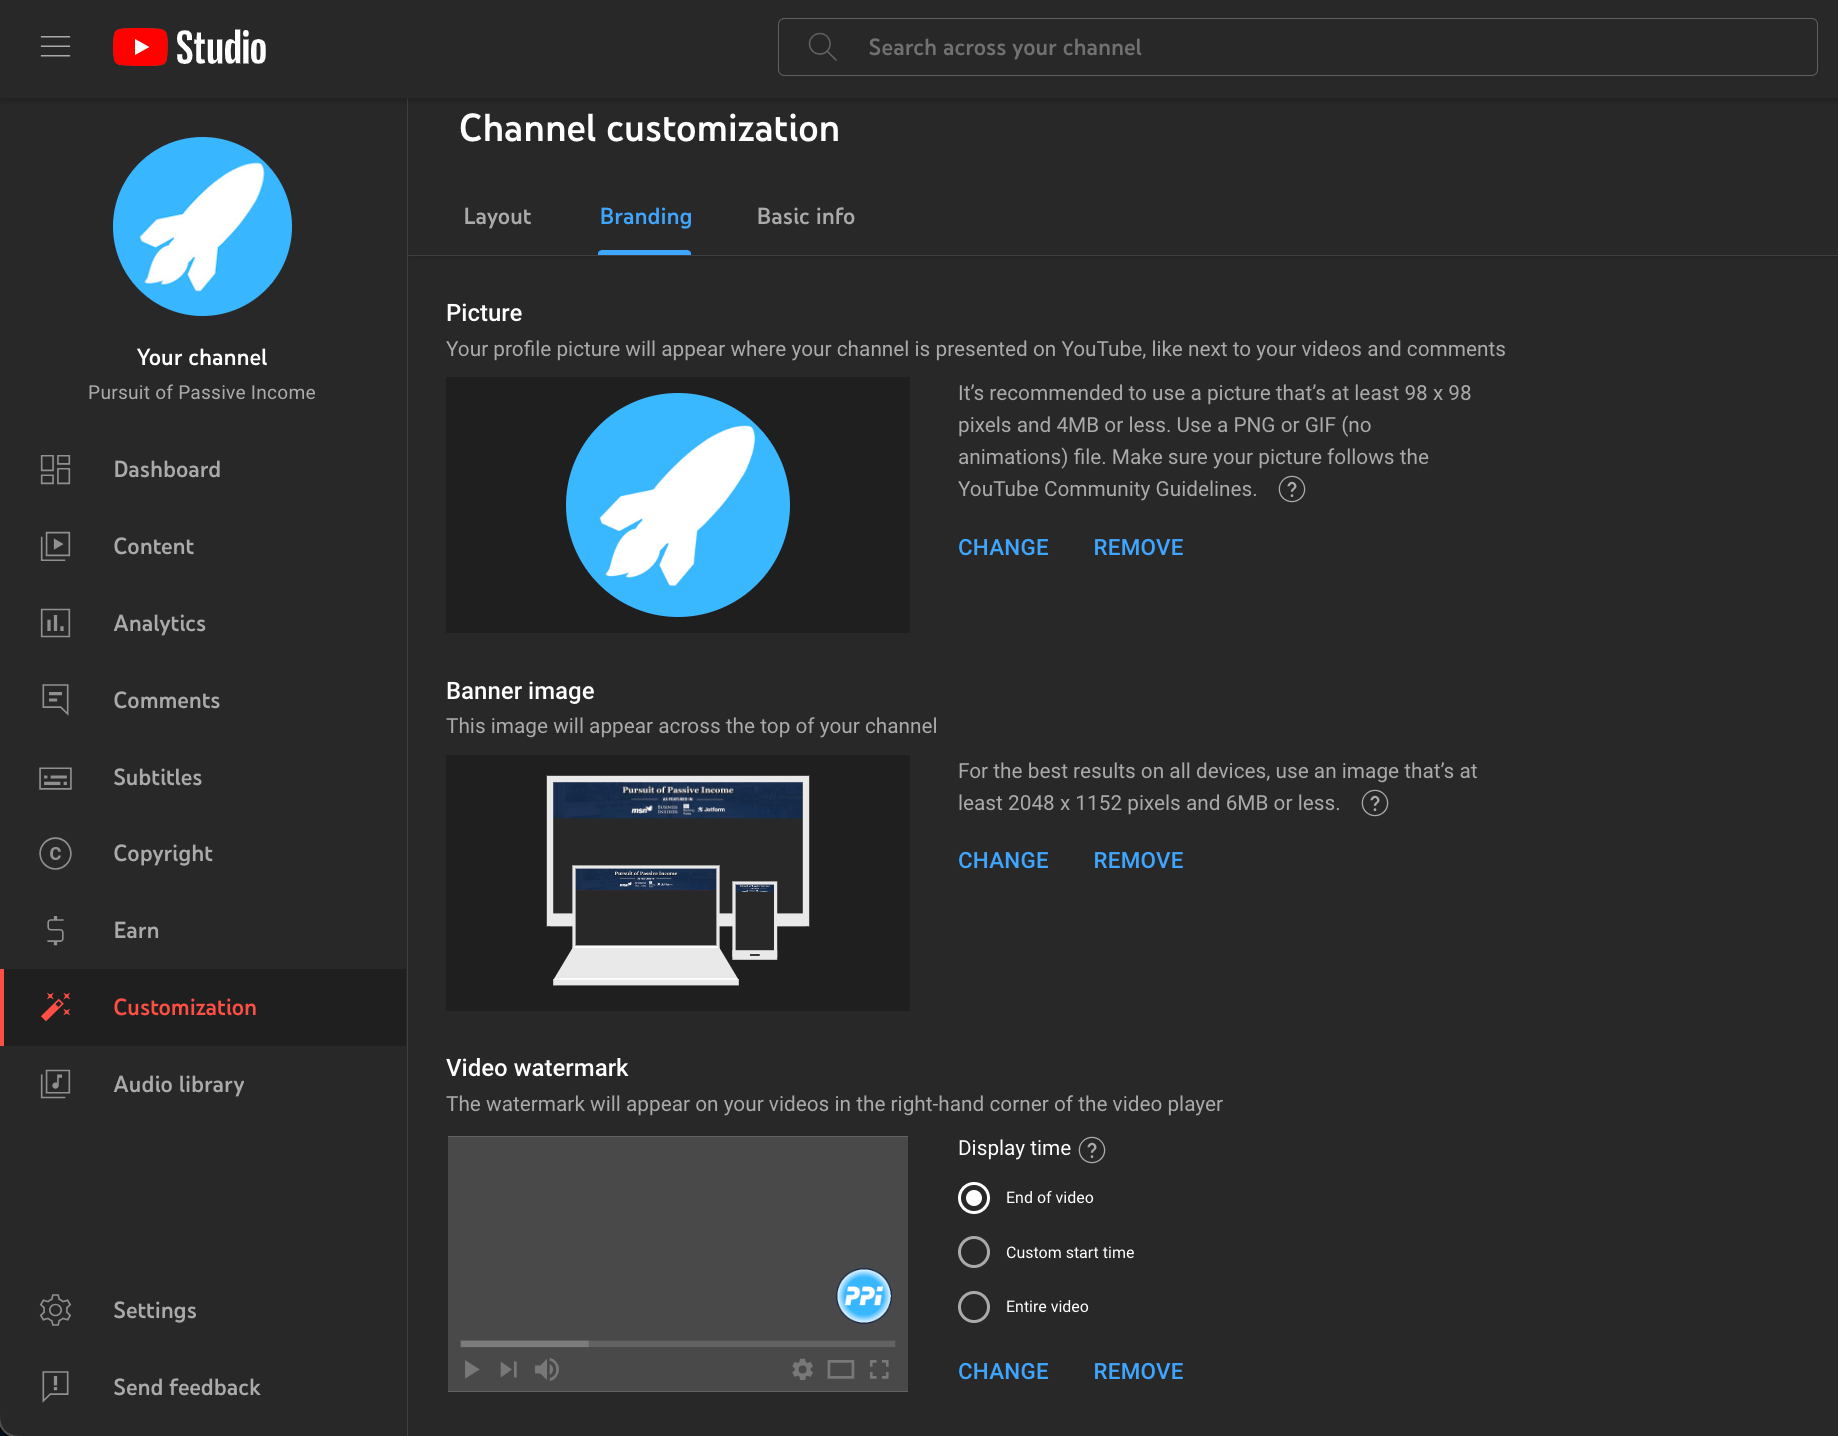
Next, select “Customize” along the sidebar within your YouTube Studio and navigate to the “Branding” tab.
This is where you will upload your profile picture as well as your banner.
Again, we recommend using Photoshop or Canva to create a simple logo for your channel, or if you want something more professional, feel free to hire a logo designer on Fiverr.
At any rate, make sure the logo is recognizable as it will display relatively small on your videos.
The recommended dimensions for your YouTube channel logo are 800 x 800 pixels.
Basic Information
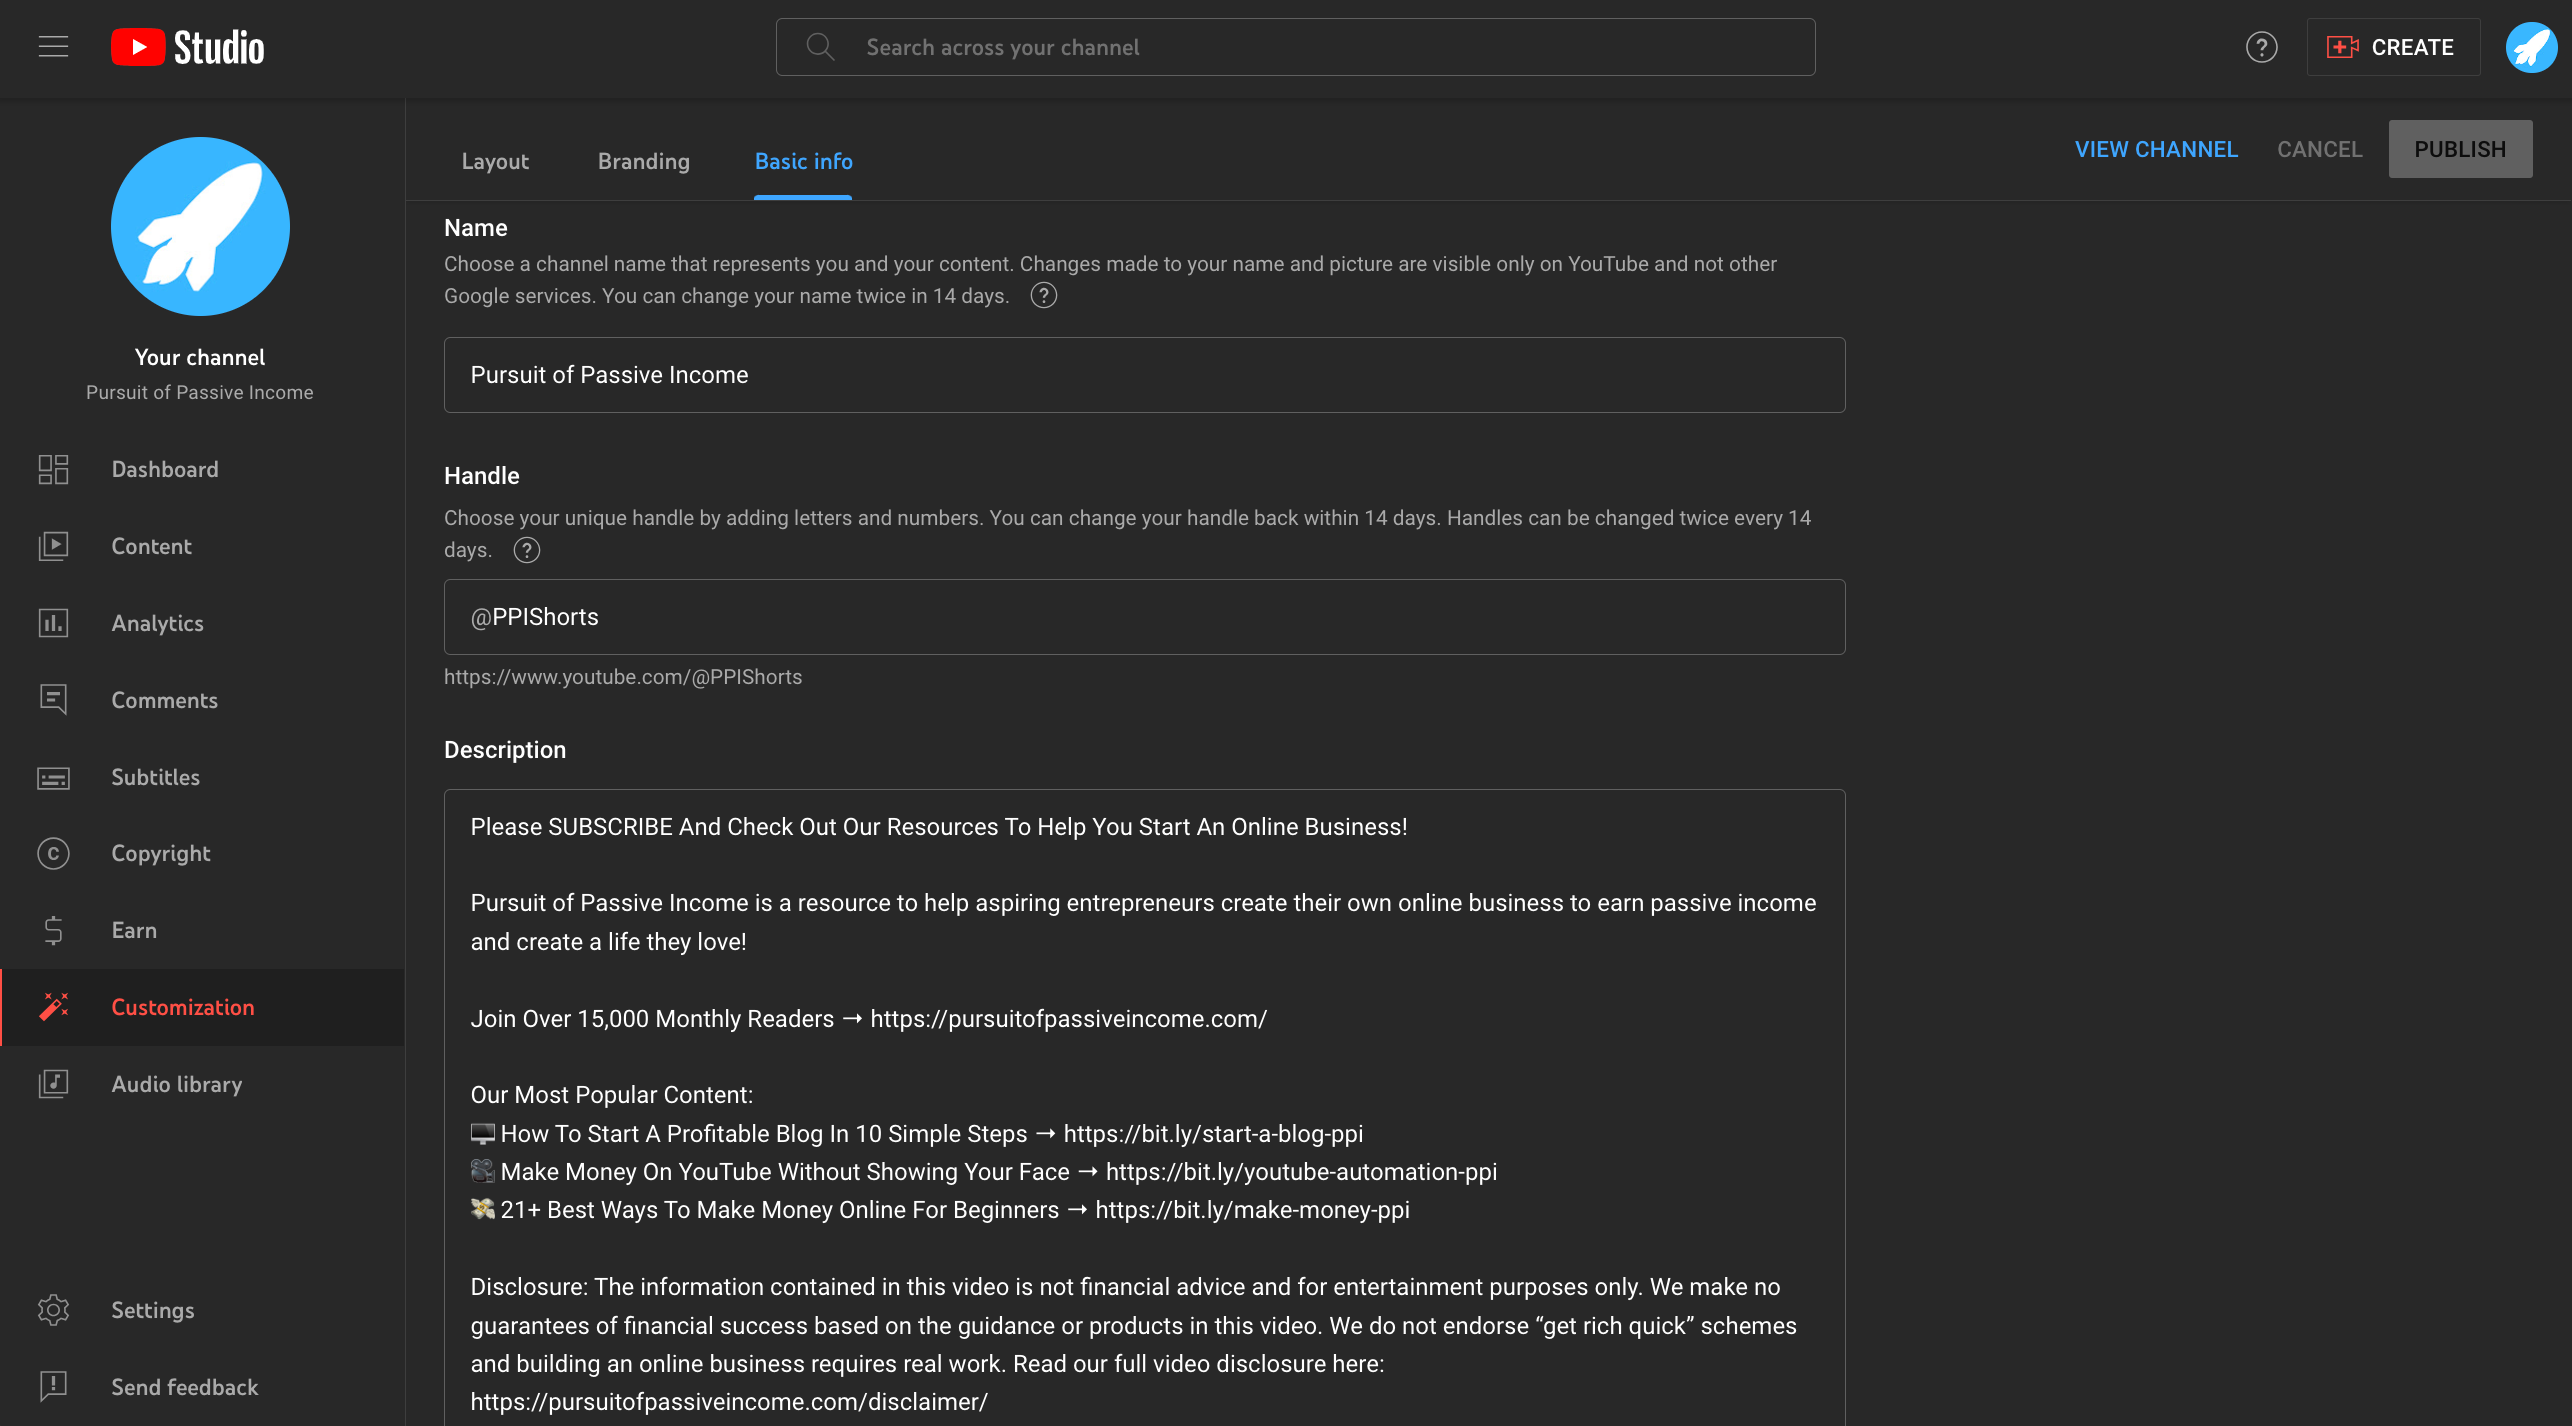
Next, navigate to the “Basic Info” tab, and input the name as well as the handle for your channel. No need to overthink this at the beginning, it can always be changed down the road.
From there, add a description for your channel and include any relevant links to your blog or any other assets you might want to share with your audience.
Basic Settings
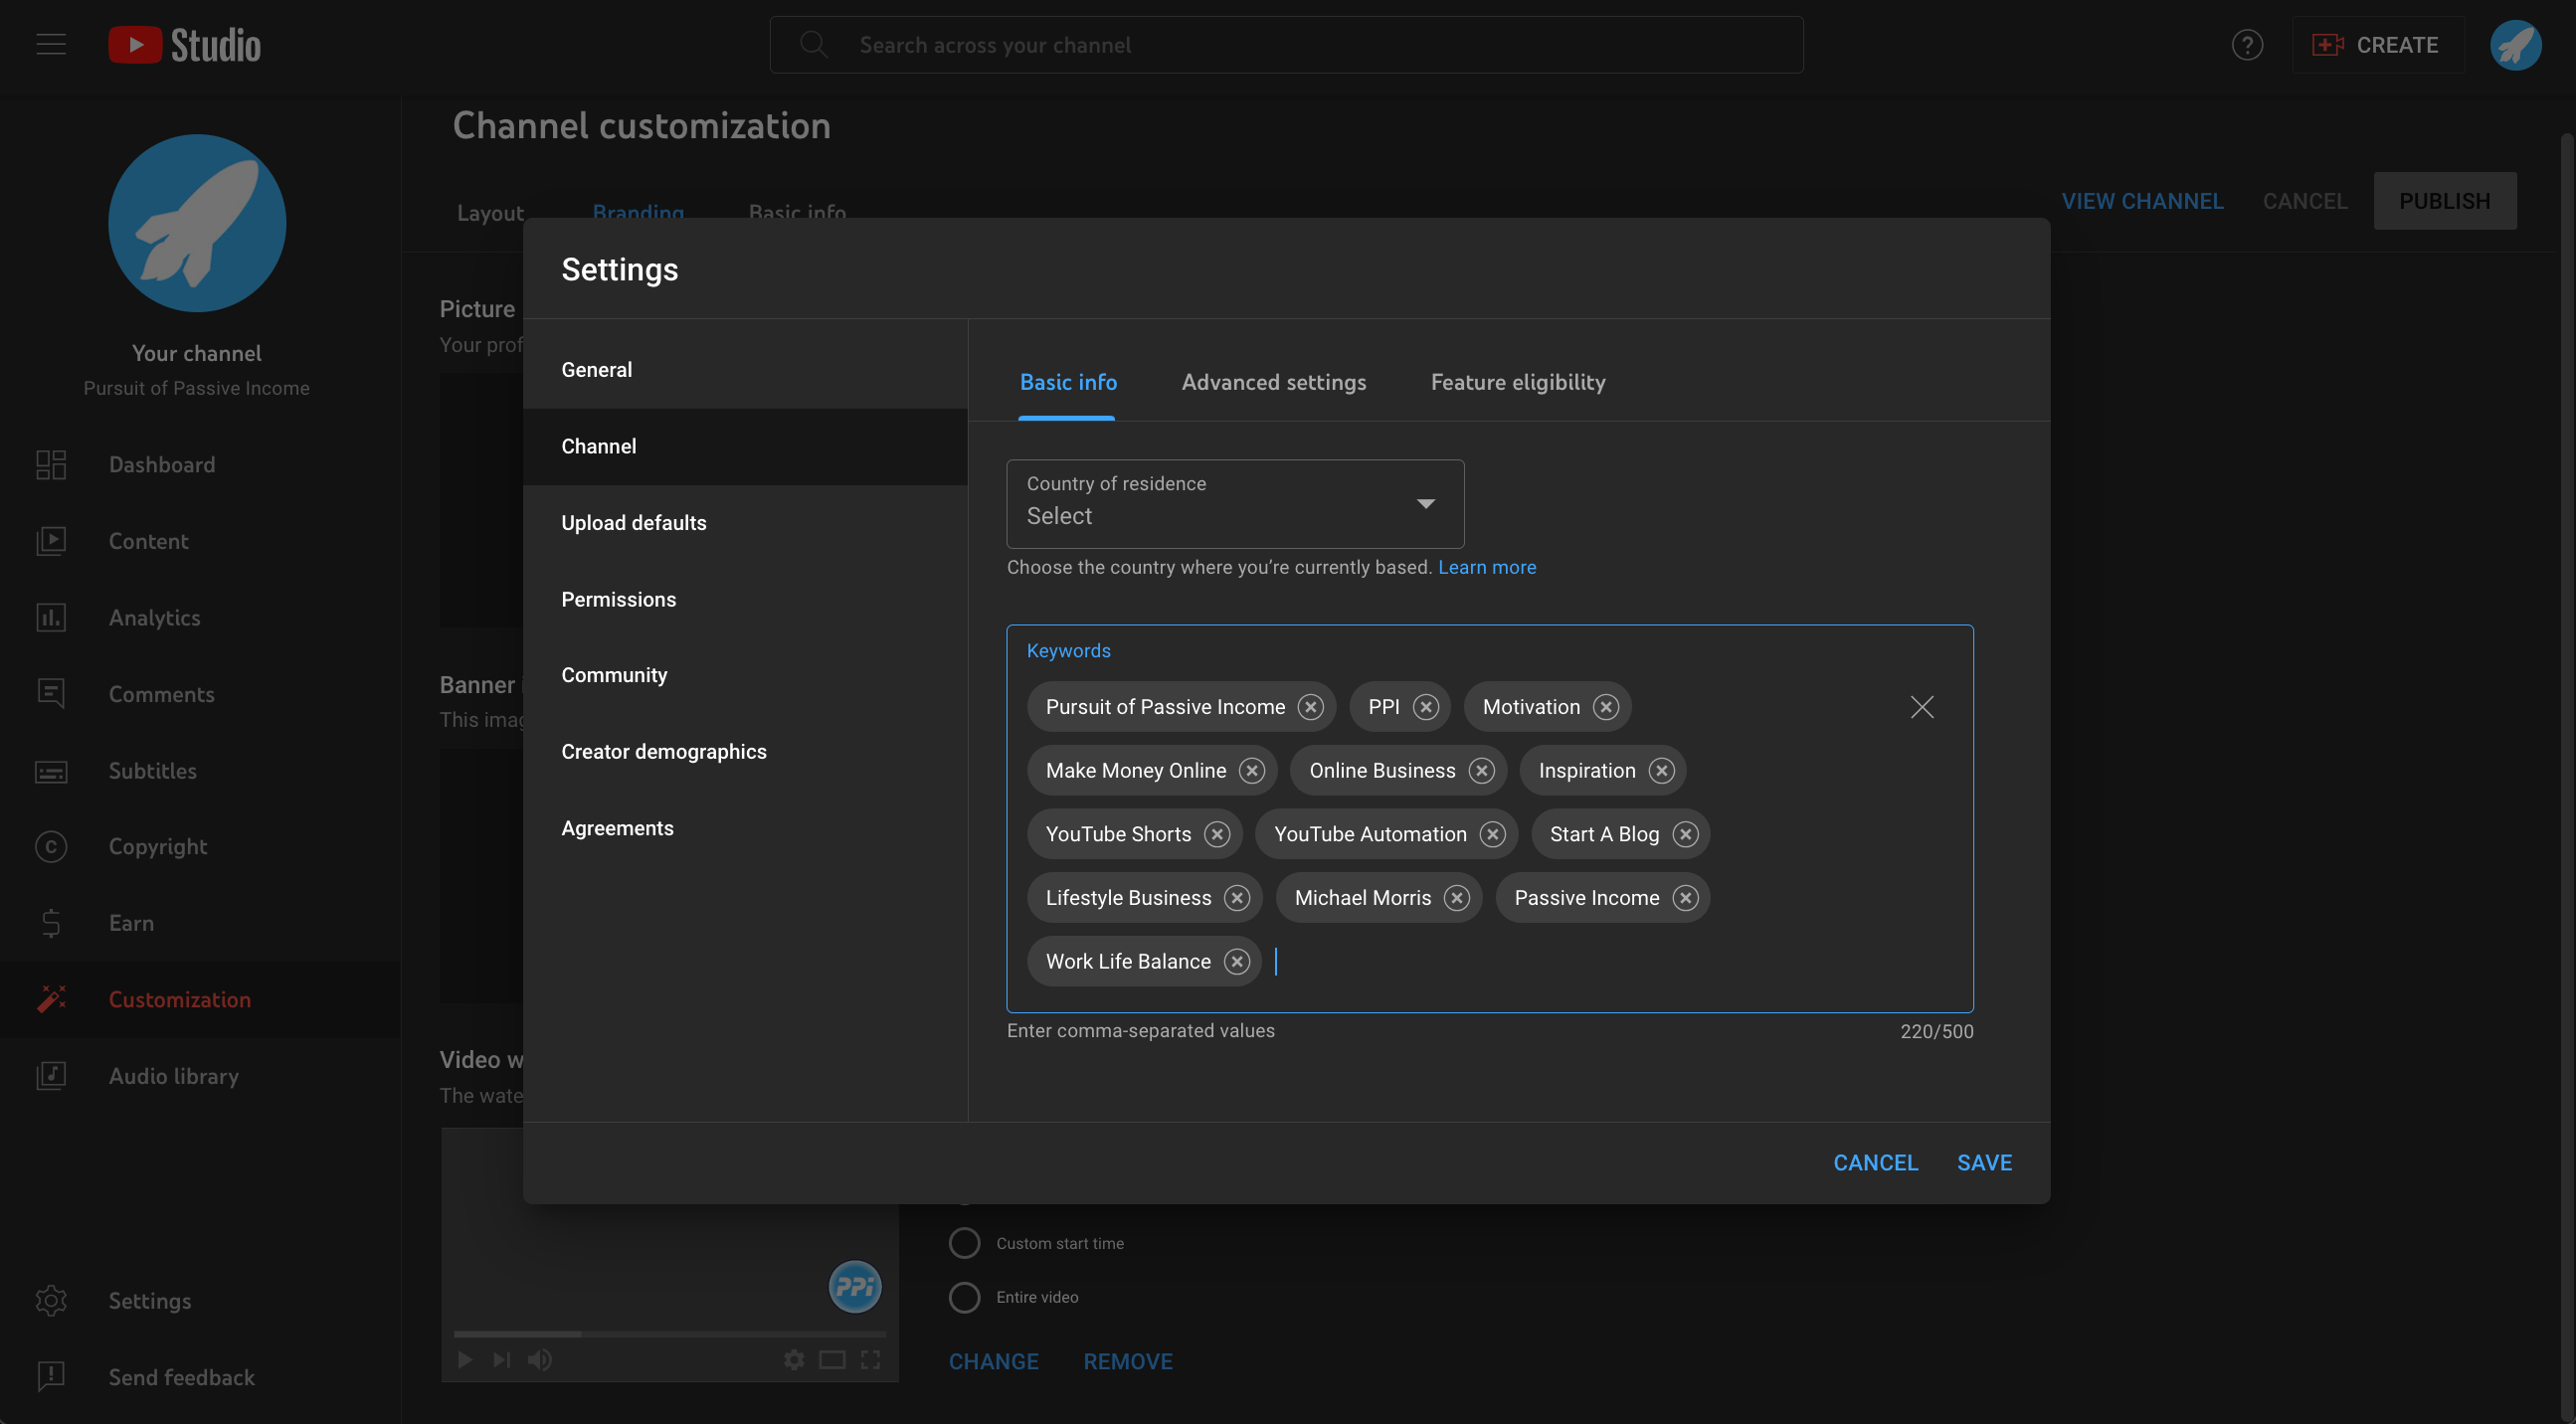
Finally, click the “Settings” tab on the left-hand sidebar, then select “Channel.” Include some keywords that are relevant to your niche to make your channel more discoverable.
That’s it for your basic set up!
Step 5: Tools & Software
We’ve talked about Artlist being our preferred stock footage provider, but here are a few other tools that will be essential to your YouTube automation operation.
Video Editing Software
If you’re editing your own videos when just starting out, you’ll need a video editing software to produce your videos.
We use and recommend Premiere Pro as part of the Adobe Creative Cloud suite of products. In fact, we recommend starting out with both Premiere Pro for video editing and Photoshop for graphic design purposes to include thumbnails and other in-video elements.
Other video editors to consider include Final Cut Pro (if you have a Mac) and the best free option that we know of is CapCut. Of course, CapCut will come up short on certain features but if you really need to save some money up front, you might be able to get away with it.
With that said, all of our training videos related to video creation will be done using Premiere Pro.
Graphic Design
You will need graphic design software to create thumbnails and other graphic designs for your videos.
As mentioned, we recommend Photoshop along with Premiere Pro. But if you’re on a budget, you can always use Canva when you’re first starting out or pay a graphic designer from a site like Fiverr to do what you need.
Freelancers
Building on that thought, freelancers are the life-blood of any successful YouTube automation business. We recommend Fiverr when looking for qualified freelancers, whether for video editing, scripting, voiceovers or thumbnail creation.
Our advice is to pay a little bit extra for quality work, otherwise it is going to fall on you to pick up the pieces.
Video Planning
Finally, we recommend using Trello as your planning software to keep your video creation process organized.
This will help you keep an eye on your production schedule and keep the members of your team up to date as far as what their role is and when they need to complete certain tasks.
Trello let’s you create a card for each video idea then move it along through different stages of the production line!
Step 6: Start With Shorts & Get Monetized
Next, we want to get your channel monetized as quickly as possible so you can start earning ad revenue from Youtube.
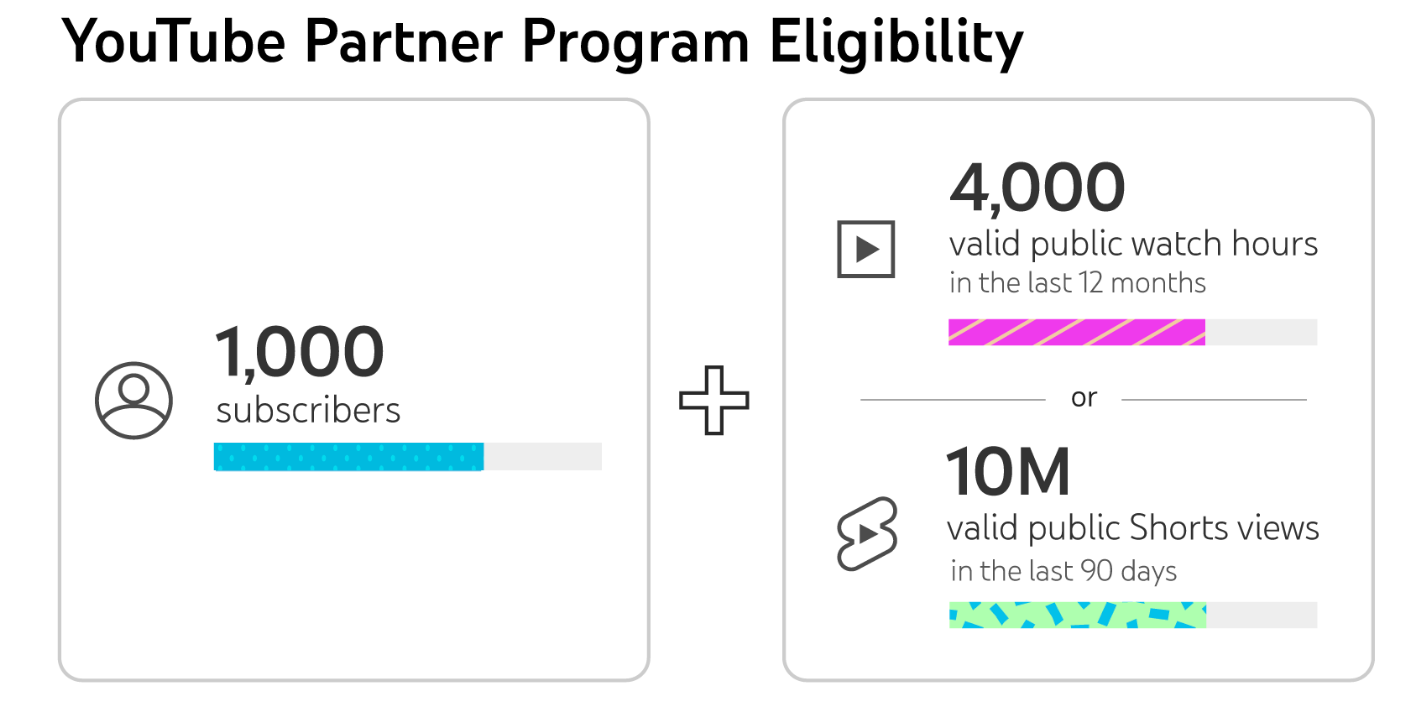
The requirements to join the YouTube Partner Program are as follows – 1,000 subscribers and either 4,000 watch hours for full length videos OR 10 Million Shorts views in the last 90 days.
YouTube Shorts
The quickest way to qualify a brand new channel for monetization is through YouTube Shorts.
This is simply because the time and effort to create 1 minute Shorts is much less than it is to create 6-10 minute full length videos.
Plus, you need to test your audience and figure out what type of content they like. The best way to do this is by putting out plenty of Shorts from the beginning.
And while achieving 10 million views may seem impossible, if you create enough high quality videos, eventually you will warm up the YouTube algorithm and soon enough, a couple of your videos are sure to go viral!
Create Quality Content
We can’t stress this enough. Your videos must be of the best quality, otherwise people are not going to watch your videos for long enough that YouTube pushes them to the masses.
For this reason, we recommend you make your first 60 videos yourself.
Get a great system down and figure out your style of content. This way, you will better understand your audience and be able to direct your future video editor to create content you know your following will love.
Step 7: Video Brainstorm & Keyword Research
It’s time to come up with your first video topic so you can start to create and upload videos.
Video Brainstorm
When starting out with Shorts, we find it best to search your niche on YouTube, Instagram & TikTok. Find videos with the most engagement and interact with those videos with a like or comment.
This will trigger the algorithm to start pushing similar content to your feed, and you will quickly get a feel for what type of content is performing right now on the platform.
Take this content and remake it as your own, but remember, your content needs to be of higher quality than your competitors.
Keyword Research
While your YouTube Shorts will be displayed through the Shorts feed, your long-form videos must be created based on a specific keyword.
We want these videos to be discovered by people that are directly searching for your video topic.
So how do we do this? Well, we have to create videos & titles based on search terms and keywords that people are already searching for! After all, YouTube is the second largest search engine in the world.
TubeBuddy
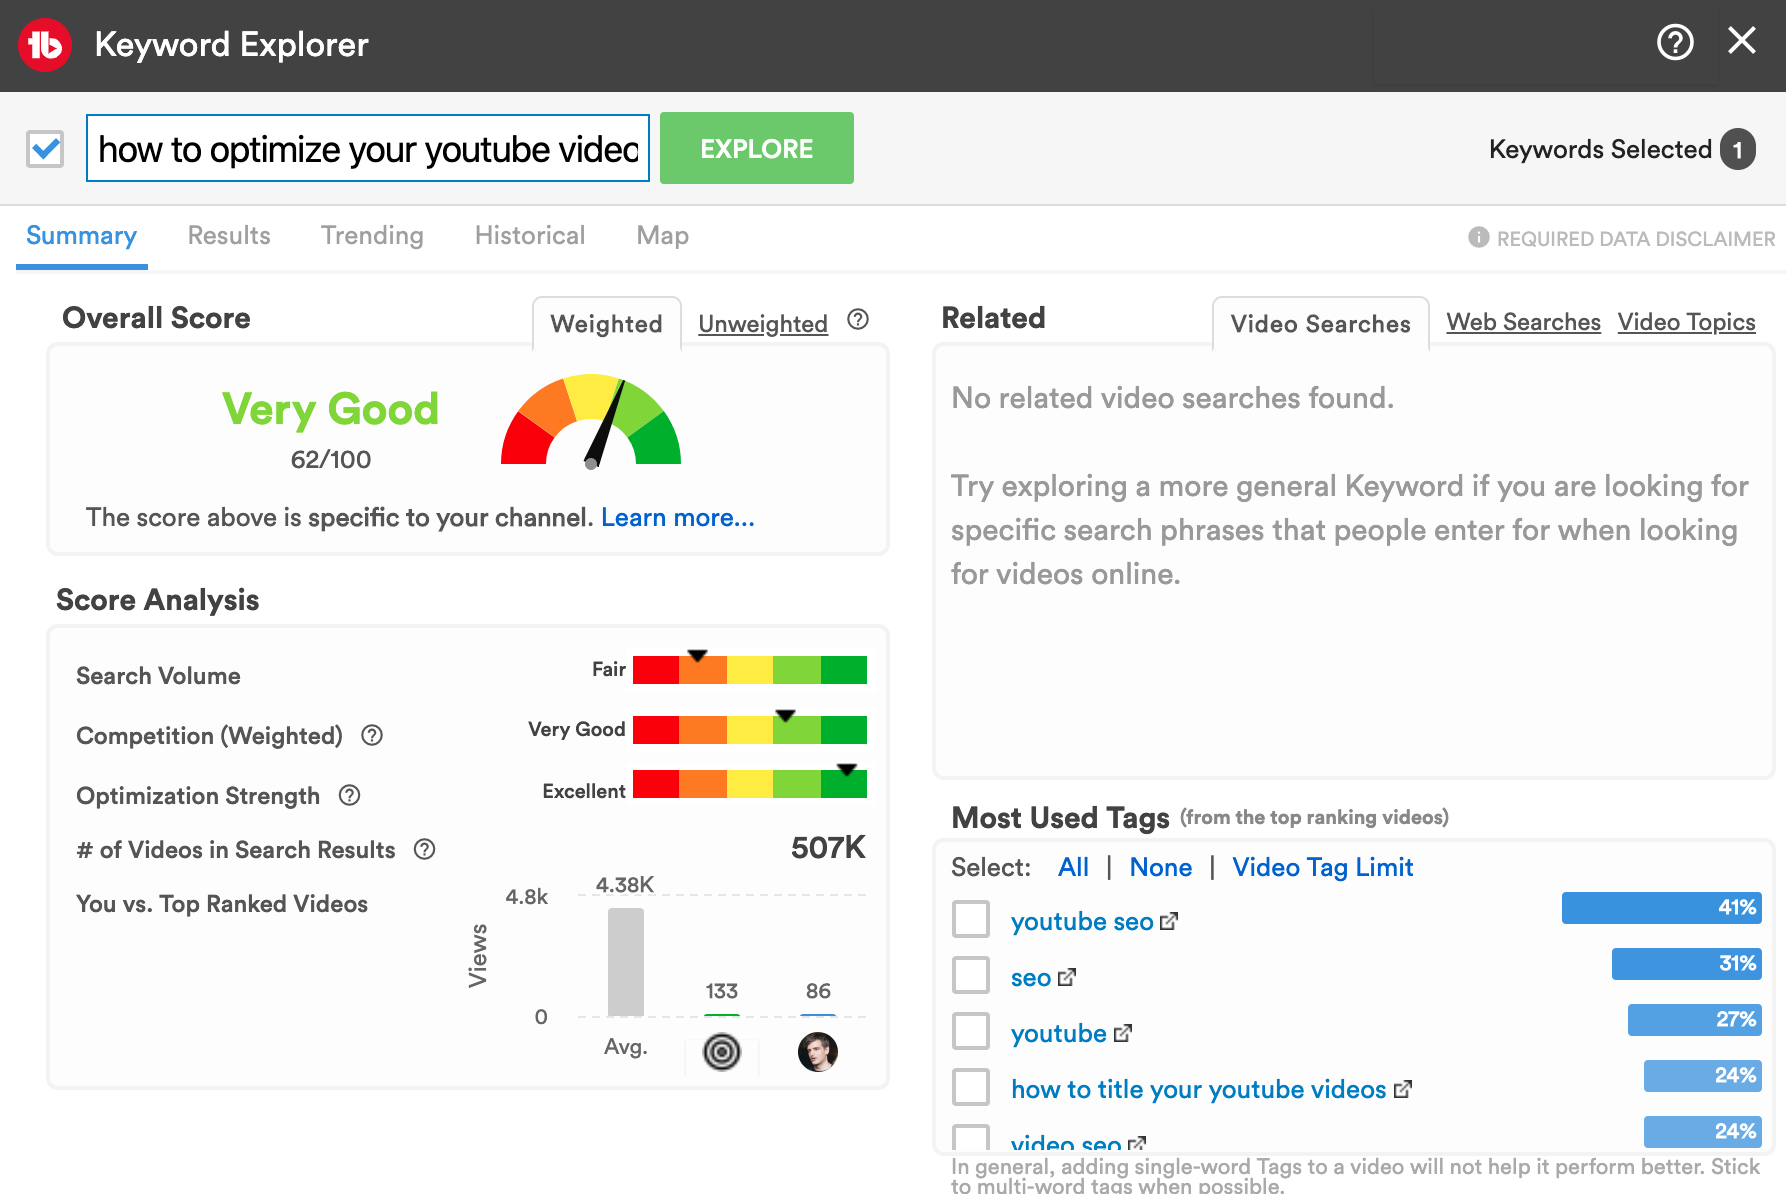
You can skimp on other tools and software, but TubeBuddy is a must have if you want to run a successful YouTube Channel of any kind.
The good news is it’s only $6 per month for the Pro Plan and you get a 50% discount if you have less than 1,000 subscribers when you use this link!
TubeBuddy helps you find search terms and keywords that are searched at a high volume with low competition. This is how you start to grow your channel.
We’ll say it again – high search volume & low competition!
It also provides you with a long list of related keywords for your search which will help you find even more relevant keywords that you’re capable of ranking for within YouTube Search.
Beyond that, TubeBuddy will suggest the best tags to incorporate on your videos, help you create the best titles, and analyze your thumbnails for maximum reach and views!
Make sure to sign up for TubeBuddy once you get your YouTube Channel set up!
Step 8: Video Creation
Now that you have chosen a niche, set up your channel and done your keyword research, it’s time to start creating & uploading videos!
YouTube Shorts
If you want to start generating passive income from your YouTube Channel fast, we recommend you start with Shorts as a way of getting as many eyes on your channel as possible.
YouTube Shorts are a maximum of 1 minute long videos that display as 1080 x 1920 pixels.
When creating these videos, they need to be fast-paced and extremely engaging.
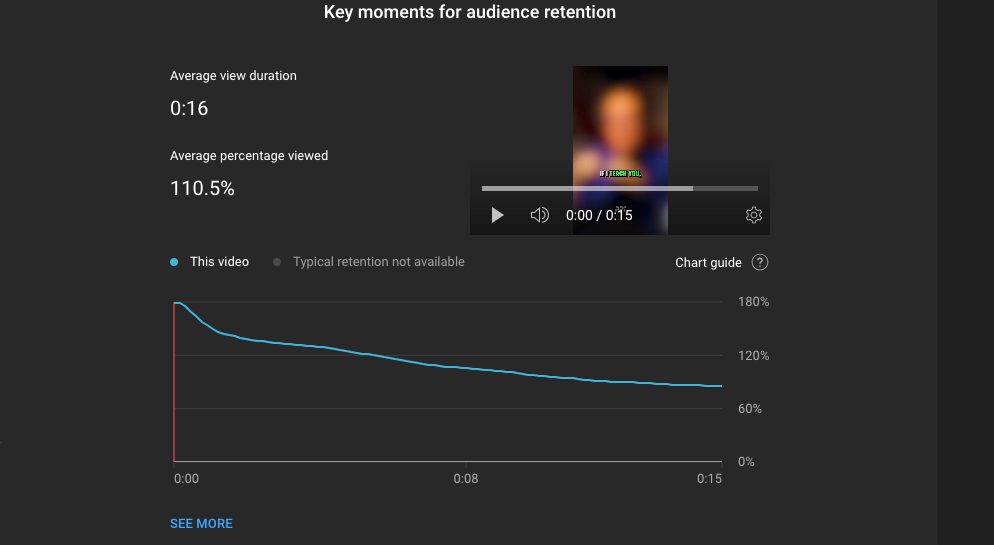
The success of your Shorts videos is almost 100% dependent on your audience retention and specifically, your average percentage viewed.
YouTube’s algorithm will push out your video content when it shows a high average percentage viewed, as that signals to YouTube that people are loving your content and therefore will show it to more people.
So how do you make your YouTube videos more engaging?
We’ve found that you need some sort of animation or graphic every 2-5 seconds.
So every 2 to 5 seconds, you should have an emoji pop up, or a picture show over the video reel, or a sound effect that draws viewers in.
Long story short, you want to create as much emotion and interest out of your viewers as possible. The viewers need to feel like they have to watch the whole video or they will be missing out.
So if you can really touch the pain points and emotional triggers of your viewers, you’re going to have a lot of success with your Shorts!
Long-Form YouTube Videos
Ok, so you’ve reached 1,000 subscribers and met the 10 Million views threshold, applied and been accepted to the YouTube Partner Program.
It’s time to start creating long-form videos.
We’ve found the sweet spot for longer videos on YouTube is around 4-10 minutes. With that said, if you can keep people engaged and watching your videos for longer, please go for it!
The same principles go for your long-form videos as your Shorts videos.
You want as much engagement and watch-time as possible. So in order to create these videos, you need all of the following:
- Video Idea
- Keyword with High Search Volume & Low Competition
- Clickable Title With Keyword or Key Phrase Included
- A Video Script Telling A Story Or Providing Value
- A Great Voice-Over
- High Quality Stock Footage & Other Elements
- Audio Tracks & Sound Effects
- A Skilled Video Editor
- Thumbnail Designer For Maximum Clicks
- Virtual Assistant To Upload Videos With Proper SEO
There you go. This is the entire process for creating the best YouTube automation channel you possibly can.
If you can coordinate all this and build systems around it, you will grow your own channel and start accumulating YouTube ad revenue in no time!
Step 9: Thumbnail, Title & Tags
We’ve touched on each of these already, but let’s talk a little bit more about the thumbnail, title and tags for your videos.
Thumbnail
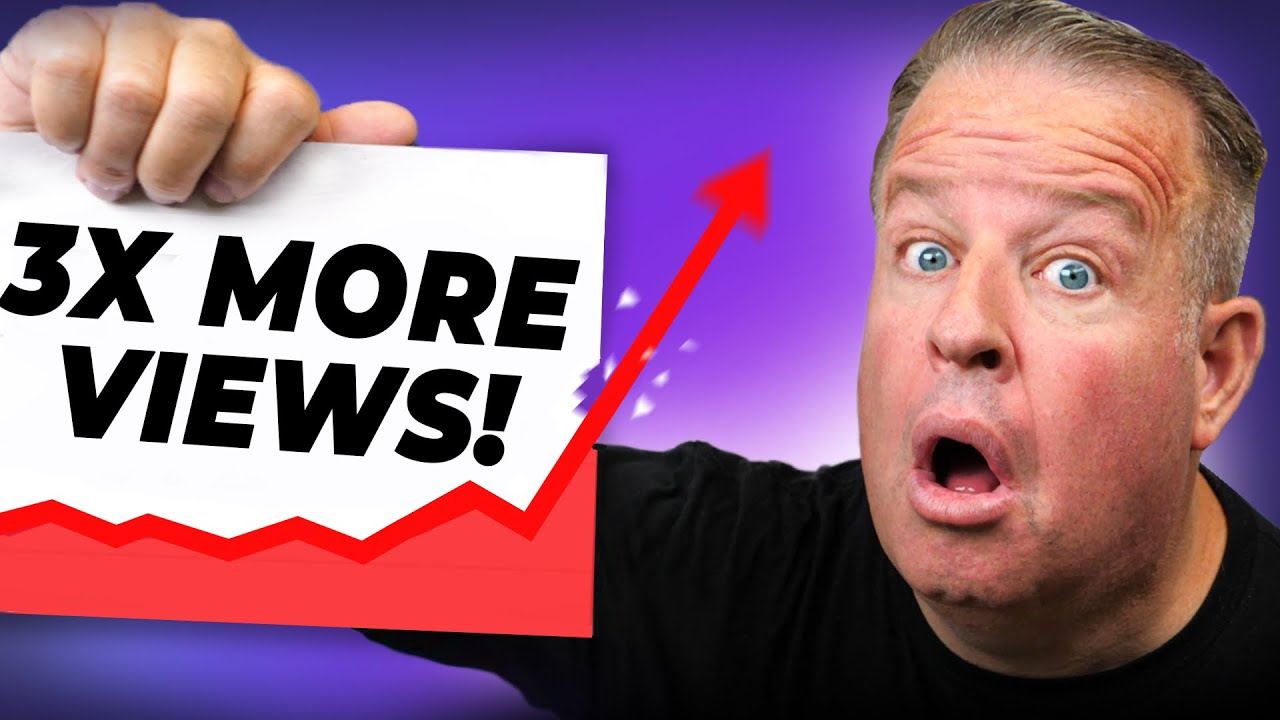
The importance of your Thumbnail cannot be overstated.
It is the difference between people clicking on your video or scrolling right past it.
You can do everything right with your video & SEO, but if you don’t have an A+ thumbnail, you won’t get any views.
Your thumbnail should use bright colors, have a little bit of legible text that lends to the video topic, and almost force people to click on the video to find out what’s included in your video.
Title
As mentioned, your title should be based on a specific keyword that you’ve chosen to target with your video.
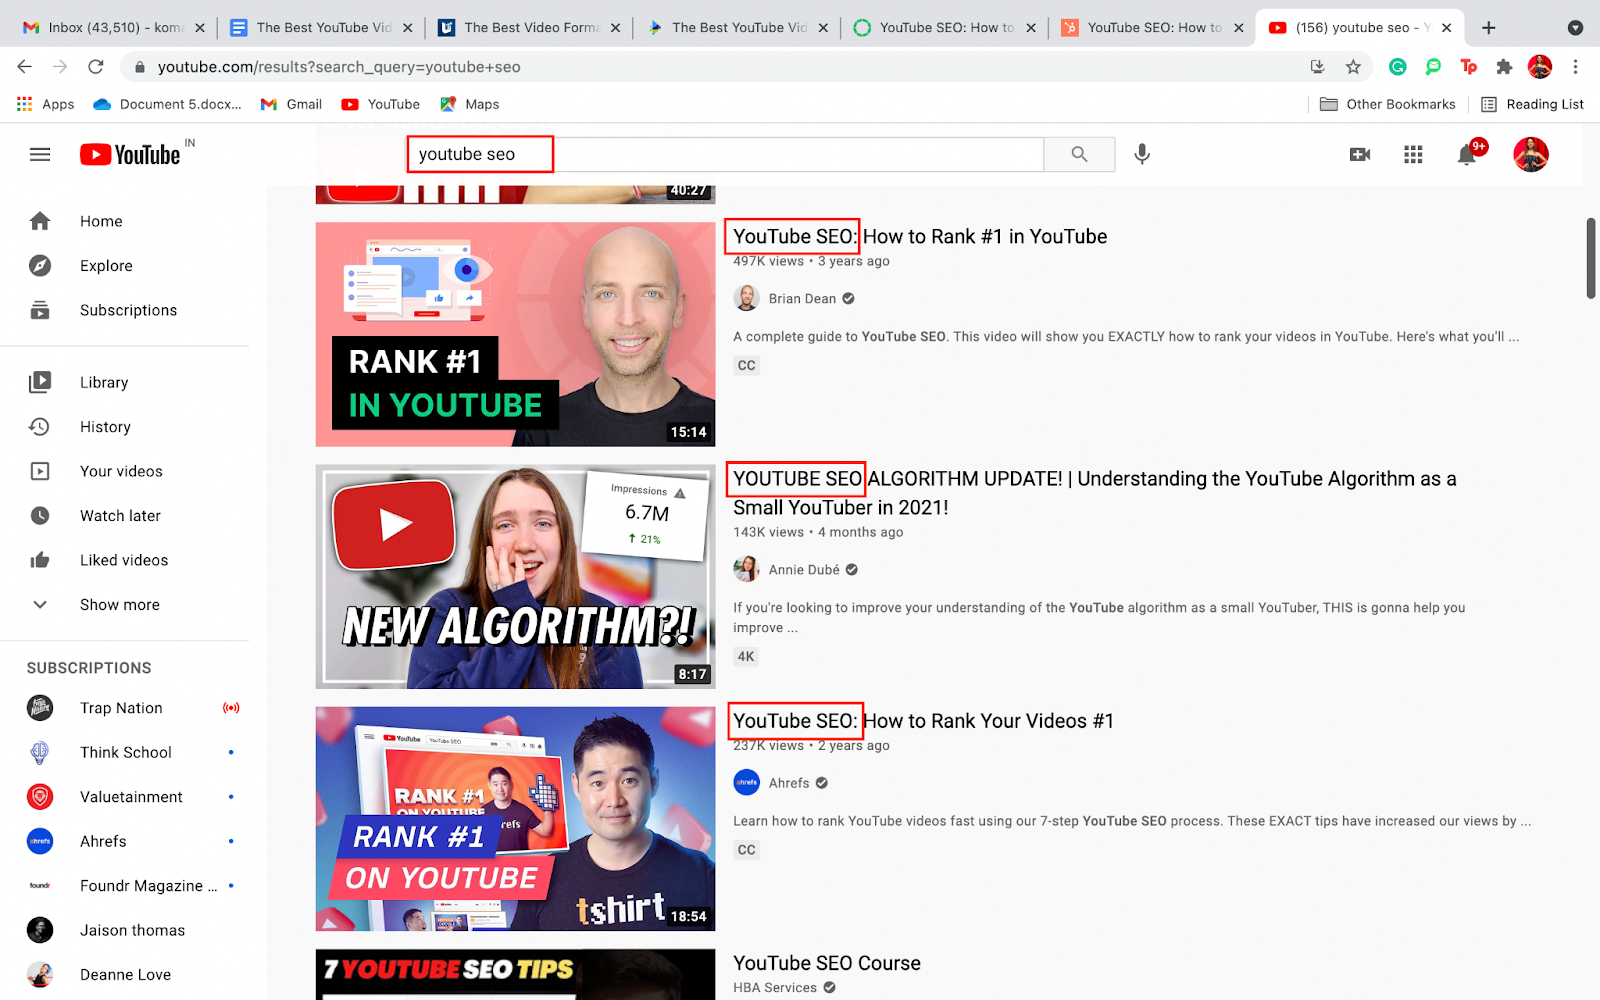
Type that keyword into the YouTube search bar for a feel of what titles are performing well.
The image below illustrates a successful title format for the keyword “YouTube SEO.”
Included in the title is the Keyword + Supporting Text to entice people to click!
This is a common title format and one that we encourage you to follow on your own channel.
For the portion of the title shown as supporting text, feel free to use ChatGPT to get ideas with a prompt such as “provide a catchy title optimized for SEO for a YouTube video based on the keyword “YouTube SEO.”
Then take the pieces you like and you’ve got a great title for your video!
Tags
In order to get more eyeballs on your video within search results, you’ll want to write a keyword optimized video description and include the best tags for maximum visibility.
We use TubeBuddy for this, which provides a full list of relevant tags for your videos.
Step 10: Automate & Stay Consistent
At a minimum, you’re going to want to publish at least 1 Short per day when starting out.
Remember, YouTube does allow you to schedule your videos to publish when you upload them, so use this to your advantage and batch your video creation and publishing as much as possible.
Automation
It’s time to build systems to create as much high quality content as possible. Remember, this is how you build a real business.
Start hiring people to fill roles in your content creation process so you can fully automate your channel.
After all, the real path to monetization is through offerings that do not actually live on YouTube.
Monetization
At Pursuit of Passive Income, we view the business aspect of our YouTube automation channels in this way.
We want to pay people to completely automate these channels and cover the operating expenses with the YouTube ad revenue the channel earns.
From there, we want to drive the viewers from the channel to our website and the various products & services we offer. This will also help us make ad revenue on our site, affiliate marketing revenue from recommending products we use and trust, and grow our email list as a way to elevate our brand.
So with that said, invest in your channel like it is a business, and build other revenue streams around the audience you create!
Stay Consistent
Finally, it is absolutely essential to stay consistent on YouTube. We know you’ve heard it all before, but this is a long-term game.
No real business is built in 30 days. Commit to an upload schedule that works for you and your team, and understand that you need to zoom our and look at your business in terms of 6 months to a year.
Where will you be in a year? How about 5 years?
Imagine you have a completely automated YouTube channel with 200,000 subscribers a year from now?
Then imagine you have 5 automated YouTube channels each receiving 1 Million views per month 5 years from now?
Take a conservative CPM of $5 per every 1,000 views and all of the sudden you’ve built a business earning $25,000 per month in completely passive income!
So stick with it and play the long game. You’ll learn more than you can possibly imagine, and before long, you’ll be a real online entrepreneur with a real passive income business.
Bonus: The Best YouTube Automation Tools
Ok so since we are trying to build a channel that stands completely on its own, it’s important that you leverage the best YouTube automation tools.
Here is a complete list of the most important tools we recommend.
Adobe Creative Cloud
We use Premiere Pro and Photoshop to edit all our videos and create out graphics & thumbnails. We wouldn’t be able to operate efficiently without it.
Adobe offers a significant discount for students, but it is worth it either way.
Check out Adobe’s Suite of products using this link.
TubeBuddy
TubeBuddy is another tool that is absolutely essential for YouTube creators.
From keyword research to title generation and proper search engine optimization, TubeBuddy has you covered!
Make sure to apply the discount for those of you with under 1,000 subscribers!
Artlist.io
Artlist is our go-to for premium stock footage to help make your videos engaging for more views, more subscribers, and more income!
Access their full library of copyright free footage using this link!
Fiverr
Fiverr is your lifeline for building an effective team to operate your channel. We use Fiverr to find great talent and put our YouTube business on autopilot.
Feel free to use this link if you’re ready to start browsing around for freelance help!
Final Thoughts: Start A Real Business & Invest In Yourself
Hopefully, you have a pretty good understanding of what it takes to succeed with YouTube automation after going through this guide.
Make no mistake that you are starting a real business that needs to be treated as such.
Never be afraid to invest in your business and in yourself to grow both your income and your skills.
YouTube is a slow start with a big reward down the road if you’re able to stick with it. So zoom out and look at the business plan over the course of 6 months to a year.
Get through that initial time frame then re-evaluate what is working and what’s not. Adapt and evolve as you go and soon enough, you’ll be ready to take your new YouTube Automation Channel full time!

